
Many academics use LinkedIn “just in case someone contacts them.” Our job today is to make your LinkedIn profile great enough that others will be eager to contact you. We’re also going to build out your network a bit, so others can see the high profile work you’ve done.
For today’s challenge, we’re going to:
- Highlight your best work
- Connect with other researchers
- Create a profile that presents the best version of you and also doesn’t need a lot of regular maintenance
Firstly, sign up for a LinkedIn account, if you don’t already have one. Or login to your current LinkedIn profile.
Note: Your LinkedIn profile is set by default to notify other people when you have viewed their profile. Some people don’t like this, and prefer to “lurk” in private. You can turn this off in your “Privacy & Settings” menu (see the limitations section below).
Step 1: Create a solid, low-maintenance profile
You want to create a profile that presents the very best version of you, and also doesn’t need a lot of regular maintenance. (Who has time for that?) You’ll do this by writing a headline and summary that makes it clear in general terms why you’re a smart and talented researcher and choosing a profile photo that’s both professional and inviting.
Make yourself memorable with a good headline
LinkedIn includes a short text blurb next to each person’s name in search results. They call this your “Headline,” and just like a newspaper headline, it’s meant to stimulate enough interest to make the reader want more.
Here are some keys to writing a great LinkedIn headline:
- Describe yourself with the right words: Brainstorm a few keywords that are relevant to the field you’re targeting. Spend a few minutes searching for others in your field, and borrowing from keywords found in their profiles and Headlines. For instance, check out Arianna C’s Headline: “Conceptual Modeling, Facilitation, Research Management, Research Networking and Matching”. Right away, the viewer knows what Arianna is an expert at. Your headline should do the same.
- Be succinct: Never use two words when one will do. Barbara K., who works in biotech, has a great Headline that follows this rule: “Microbiologist with R & D experience.”
- Show your expert status: What makes you the chemical engineer/genomics researcher/neuroscientist? Do you put in the most hours, score the biggest grants, or get the best instructor evaluations from students? This is your value proposition – what makes you great. Those with less experience like recent graduates can supplement this section by showing their passion for a topic. (I.e., “Computer scientist with a passion for undergraduate education.”)
- Use a tried and true formula to writing your headline: 3 keywords + 1 value proposition = Headline success, according to career coach Diana YK Chan. So what does that look like? Taking the keywords from (1) and value proposition from (3) above, we can create a Headline that reads, “Computer scientist with a passion for undergraduate education and experience in conceptual modelling and research management.” Cool, huh? As we mentioned in Day 1, well-written headlines that include your keywords are also key to making you more findable online.
- Add your eye-catching headline to your LinkedIn profile: go to the “Profile” tab at the top of your LinkedIn screen and selecting “Edit Profile” from the drop-down menu. Then Copy + Paste your headline into the text box below your name.
Add your keyword optimised Bio
Again, go to the “Edit Profile” screen, scroll down to your “Summary” section, and Copy + Paste your web-optimised bio from Day 1.
Add your profile image
In the “Edit Profile” screen, click on your image (or spot where image should be) and upload your professional-looking profile image from Day 2.
Step 2: Highlight your best work
Next, let’s prepare for making a good impression on your LinkedIn network by highlighting the work that’s most important to you. And you’re going to get others to notice it by making sure some of it’s eye-catching.
Brag about your best publications and awards
Consider your publications and awards the vegetables – the stuff you really want to be consumed. You’re going to make others notice them by listing them alongside the sweets – your eye-catching content.
You’ll want to highlight only your best publications (especially those where you’re a lead author) and most prestigious awards (i.e., skip the $500 undergraduate scholarship from your local Elks club). List no more than 5 total.
Here’s how to add them: in Edit Profile mode, you’ll see a “Recommended for you” panel to the right of your profile photo and header section. Click the “Publications” tile to add that section to your profile.
On the Publications section, you’ll need to manually add publication details. Here are the most important details to include:
- Title (this one’s a no-brainer)
- Publication URL (so others can click through to read your work)
- Description (include your abstract in this space)
You can also add your co-authors, if they’re on LinkedIn and you’re already connected.
Now that your articles are added, drag the Publications section to appear just above or below any eye-catching content on your profile.
Add some eye-catching content

With a little ingenuity you can make LinkedIn pretty good for showcasing what researchers have a lot of: posters, slide decks, and figures for manuscripts. If you’ve ever given a talk at a conference, or submitted a figure with a manuscript for publication, you can upload it here, giving viewers a better taste of your work.
Neuroscientist Bradley Voytek has added a Wow Factor to his profile with a link to a TEDx talk he gave on his research.
Pharmacology professor Ramy Aziz showcases his best con
ference talks using links to Slideshare slide decks. In the screenshot to the right, Rebecca Mitchell provided eye-catching links to media articles about her research and her opinion pieces.
You too can upload links to your best – and most visually stimulating – work for a slick-looking profile that sets you apart from others. Here’s how:
- Add links, photos, slideshows, and videos directly to your profile using the Upload icon on your profile’s “Summary” and “Experience” sections.
One caveat to adding content to your profile: LinkedIn does not offer analytics that show you how often your work is viewed or downloaded on the site. So, you’ll be unable to say with certainty what LinkedIn has done for your readership and so on, but that’s okay: LinkedIn is more about relationships and the boost they’ll give your reputation, instead. Read on.
Step 3: Connect with other researchers
Connecting with other researchers on LinkedIn is just one more way to build an audience for your research. Connections help you maintain relationships with past and current colleagues, who are likely interested in your work and want to read about it.

It’s surprisingly easy to find people you already know and add them to your network on LinkedIn.
Use the Add Connections tab in the top right corner of your profile to connect LinkedIn to your email account. LinkedIn then suggests Connections based on your contacts.
Note: an important rule to follow for LinkedIn is to only select Connections you actually know and feel comfortable asking to keep in touch (former collaborators, co-workers, and friends are good choices). When Connecting, it’s a nice touch to send a message saying hello. Networking is all about building meaningful relationships, not how many people you have in your virtual Rolodex.
Limitations
LinkedIn is a decent tool for professional visibility, but it’s not without its headaches. Chief among them is that it’s yet another information silo. (And that’s why you’re setting up a profile that’s going to be easy to maintain, so you don’t have to update it but once a year.)
LinkedIn’s also overzealous with their notification emails, sending more in a month than most of us would care to receive in a year. Luckily, they’re easy to turn off.
- Under your Account & Settings menu in the top right-hand corner, scroll down to “Privacy & Settings”.
- Click on the “Communication” tab on the left-hand side, and set the frequency of emails, push notifications etc.

You will also see in the above screenshot a “Profile” tab on the left-hand side. Here you can change your visibility, select what others see when you view their profile, etc.
Homework
Add your best work
First things first: get at least three of your most important publications onto your profile, add some eye-catching content, then rearrange your profile sections so your Publications get prime real estate next to the most visually-stimulating pieces on your profile.
Make yourself more “googleable”
Next, you need to make it easy for others to view your profile. What good is a killer LinkedIn profile if no one can find it, or if your profile is so locked down they can only see your name?
Check your “public profile” settings (go to Privacy & Settings > Edit your public profile) to make sure people can see what you want them to. What might others want to see? Your past experience, summary, and education, for starters; also include your best publications.
Next, double-check your settings by signing out of LinkedIn completely and searching for yourself on LinkedIn.
Expand your network
Finally, let’s expand your network by requesting an introduction to a new contact. If done correctly, it can get you name recognition with important researchers.
Here’s an example of how that would work: I’m not currently Connected to genomics researcher Mike Eisen on LinkedIn, but let’s say I want to collaborate with him to do some research on a great idea I have.
The first thing I need to do to connect with him is find a contact that we have in common.
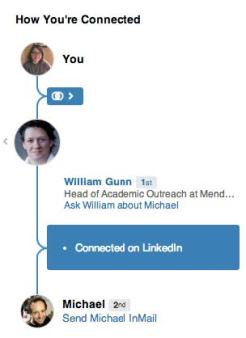
So, I visit Mike’s profile. On the left-hand side is a “How You’re Connected” graphic. I can scroll through the list of contacts we have in common to find a suitable middleman – Mendeley’s William Gunn.
Next, I would click on the “Ask William about Mike” link. In the dialog box that appears, I’d write my request for an introduction and send it to William. The request should follow three key rules:
Be specific
William might take 10 minutes out of his day to write a recommendation for me, so I shouldn’t waste his time. That means telling him exactly why I want to meet Mike: what Mike does that interests me (he’s a genomics researcher), and what I’m looking to get out of an introduction (an opportunity to tell him about my great research idea: widgets for genomics researchers).
Include a “pitch” as to why an introduction would be valuable
Likewise, I should make it clear what Mike would get out of meeting me. What do I bring to the table? In this case, it’d be the chance to learn about a well-received new widget, and a future NSF grant opportunity.
Show appreciation, and also provide William with an “easy out”
William’s time is valuable, so I should make it clear that I’m thankful that he’s considering writing an Introduction. A good way to do that in addition to saying thanks is to give him a way to turn down your request without feeling too guilty.
Two additional rules for special scenarios are: 1) If we didn’t know each other well, I’d want to remind William how we met, and 2) If William does introduce Mike and I, I should follow up with an update and thanks.
Here is an example introduction request:
Hi William,
I’m writing to ask if you’d be kind enough to introduce me to Mike (if, of course, you feel you know him well enough to do so). As you know, I’ve been toying with a new idea for widgets for genetics researchers. The prototype has been very well received by our initial user group; I think it has the potential to be a success, with the right stewardship.
It’s for that reason I want to connect with Mike. Being a well-known genomicist, Mike might be interested in the widget and, eventually, collaborating with me to go after a round of NSF funding. I hear there’s an upcoming “Dear Colleagues” letter that may be specifically related to genetics research widget design.
Thanks very much for taking the time to read this and considering my request. Feel free to decline if you don’t have the bandwidth to make the Introduction right now, I completely understand.
Best,
Stacy
One final note: keep your requests for introductions to “2nd degree connections”– that is, friends of friends – because your chances of getting a meaningful introduction to a stranger through a friend of a friend of a friend depends on too many variables to be successful.
You’ve just completed the Day 8 challenge. Congrats! But there is plenty more to come! We’ll be bringing you a challenge to find your community on Twitter. See you tomorrow!

Good morning, today and tomorrow and two social media channels that engage a broader audience, but are both popular with academics and will both increase your Googleability! If you are already on these channels, I think there are some good exercises here that will assist you to delve deeper into using them to promote your work and engage with other researchers.
Feel free to ask questions and share your experiences here!
Best
J
LikeLike